| Binding & Finishing The End of the Line
or What Do You Do After It's Printed...
The final step in converting a printed sheet to product is called finishing and/or binding. They are as equally significant a stage as everything that has gone on before and must be planned into the original design. While bindery and finishing are usually the last phases of a printed job, it is important to identify these needs up front when planning the job so that all will run smoothly.
Finishing includes mounting, diecutting, coating, laminating, embossing, punching, gluing, and marbleizing. Binding is the work required to convert printed sheets into books, magazines, catalogs, and folders. Following are the steps of the finishing process.
Scoring
Heavy stocks or those requiring precise folding should be scored prior to folding. Generally, this is a separate operation on letterpress equipment. But, some scoring may be done in-line on offset equipment for certain jobs.
Trimming
Once a piece is printed, trimming is usually done to clean up the sheets. Since trimming cannot be 100% accurate from sheet to sheet, certain tolerances must be taken into account. A common mistake that is made is not allowing overwork for images intended to bleed off the edges of the page or sheet. Normally this overwork should be no less than 1/4”.
Embossing
Embossing results in a dimensional image on a sheet. The embossing may be single-level or sculptured (referred to as multilevel). Single-level dies are the least expensive and may be mechanically prepared. Multilevel dies are made in much the same way a sculptor executes a work of art and are therefore more expensive. Embossing may be either blind (applied without any printed image), foil (applied with foil at the same time as embossing) or printed (embossed over a previously printed image).
Foil Stamping
Application of a flat surface of foil can add much to a printed piece. Foils are not only metallic, but may be holographic, tints or pigmented. Pigmented foils, including white, are usually opaque and are used frequently to imprint a light image or type on dark stocks, thus reducing multiple passes required in lithographic or letterpress printing processes to achieve the same degree of opacity.
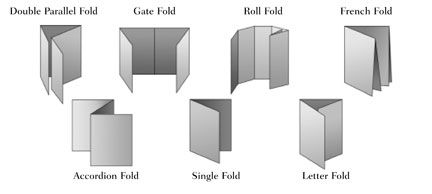
Folding
Folding is a relatively imprecise operation, so you must leave room for variations in the folds. Remember also that each fold is affected by the variation in the previous fold and the selection of paper. Prepare a paper dummy of the folds before you go to press, and remember to allow adequate trim for the bindery operation.
Binding
When planning your job, you need to decide if it will be bound and how. Talk about the bindery requirements with your printer or trade binder before going into production. Listed below are some common bindings and definitions.
Saddle Stitching
Signatures inserted into each other and stapled through the spine. Requirements: Lip on back of signature at least 1/4”. Head trims and foot trims should be 1/8”.
Side Stitching
Stapled through stack, parallel to spine.
Spiral Binding
Wire spiral inserted through hole-punched stack. Requirements: Minimum trim of 1/8” on head, spine, foot and front - more desired. Binding margin is 1/2”.
Comb Binding
Plastic comb binding inserted through hole-punched stack.
Perfect Binding
Perfect-bound books are made from signatures that are stacked. On the left side, the folds are trimmed away. Hot glue is applied to the spine and the cover is pressed against it. Then the other sides of the book are trimmed away. Head trims and foot trims should be 1/8” or more.
Last Word on Finishing
If your printed project is going to be die-cut, coated or finished in any of the ways mentioned above, note that the mechanical requirements for these processes must be built into the design of the printed piece. For instance, aqueous and UV coatings are spectacular, but certain ink colors do not take coating as well as others. Always consult with your printer about your finishing plans, even if the printer is not coordinating the whole project |